download tutorial versi indonesia disini.
how well how to make a dragon ball with photoshop? let us see the tutorial ... ^-^...
First open potoshop and create a new worksheet ... here I use the ps cs3 with a4 size

Then create a new layer by pressing shift + ctrl + n after that press ok

The phase 3 select Layer 1 and create a circle with the elliptical marquee tool ... and then make a selection on the worksheet by pressing the shift key at the same time ..

Select a foreground color and set the settings as shown below ...

After setting the color is finished next press alt + backspace to colorize the selected area and the result will be as shown below ..

Press ctrl + d to turn off the selection, duplicate layer 1 by pressing ctrl + j formed twice .. be Layer 1 copy and Layer 1 copy 2


Then select blending option: custom, see pictures below and adjust the settings as shown below when finished press ok ..

Select Layer 1 copy and then select Filter-sketch-reticulation, and set the settings as shown below stelah finished press ok ..

At Layer 1 copy change the blending become lighter color mode with 100% in opacity


Having selected a custom shape hereinafter click the icon and then select all shapes, more details, see the picture below .. well now lives looking for the star image ...

Create as many stars you want ...

When finished making star select direct selection tool, then right click on the star and select make selection, make sure the note before pressing ok feather radius contains 0 px


Once selected press alt + backspace to color the same color ball star ...

Then change the blending mode to screen ...

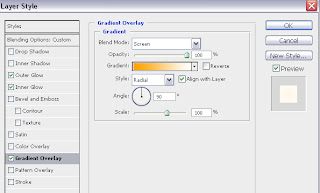
Select layer 2 and then right click-blending options- gradient overlay settings .. see below, and checklists outer glow and inner glow without changing the settings ... when you finish press ok
Duplicate Layer 1 copy 2 by pressing ctrl + j then turn off all layers except Layer 1 copy 3 and then delete the unnecessary parts like the picture below .. and then change the blending mode of becoming multiply ...

Turn all the layers again and select Layer 1 and press ctrl + j, forming Layer 1 copy 4, then select Filter- Blur-Radial Blur and change the amount: 75, blur method: zoom like the image below ...

previous change background to black by pressing d advance in order to turn black foreground next press alt + backspace ...

After the background to black click 2 times on the background layer so that changing the name of the background into the layer 0

Right click the layer 0 select blending options and change the settings on the gradient overlay as shown below

After pressing ok will result more or less like this ...

Dargon ball already so stay beautify the picture just by adding objects and brush fire dragon and a little touch with the radial blur ... and eventually would like the image below ...

Well hopefully useful easy right .. .. .. greetings creativity By: bebe-jupie a.k.a Rizky Abe Tekken Punk
Tidak ada komentar:
Posting Komentar